- Fine Art Landscape Photography
Since both the aperture setting and shutter speed control the amount of exposure to light that the sensor gets, they have to be balanced together. A larger aperture setting lets in more light, and requires a shorter shutter opening to compensate (or over-exposure occurs). If you have a small aperture opening letting in only a small amount of light, a longer shutter opening will be needed to compensate (or under-exposure occurs). Either of these examples can produce the same amount of overall exposure, the difference is whether the sensor is exposed quickly by a lot of light coming in through the large aperture opening, or slowly by the long shutter opening.
By balancing both of these exposure controls, you have complete control over how light enters your camera and falls on the sensor or film. It can be a lot of light for a short time, or a little light for a long time and still be the same amount of light in the end. The difference is in how it happens, and the resulting image that is produced by it.
Once you understand the differences aperture settings and shutter speed can make in your images, it all seems pretty cut and dry. In a perfect world it would be as simple as that, but the world we shoot pictures in is seldom perfect and that's where the real balancing act comes in. Unless you are shooting in a studio with plenty of lights, the available light in your scene will ultimately dictate what compromises you must make in order to capture the shot. Since the amount of light available in your scene changes constantly, so does the amount of exposure needed to capture it properly.
Another thing that can affect your decisions about exposure is the lens you are using. Many lenses are sharper at certain aperture settings, and you'll find professional photographers taking this into account as well when image sharpness is a priority.
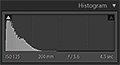 | under-exposed |
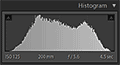
 | low-key image |
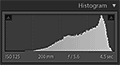
 | medium exposure |
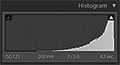
 | high-key image |
 | over-exposed |
A histogram is a visual aid to help you understand the balance of light and dark in your image. It is a graphic representation of the amount of light tones and dark tones in an image, and can help you judge your exposure in a glance. The dark tones in an image are represented to the left end of the graph (with the left edge being solid black), and to the right you'll find the lighter tones (with the right end being solid white).
In the diagrams to the left you can see what some of the common types of images will look like on your histogram. This exposure "graph" is simply there to help you accurately judge your exposure in a quick and easy way, by allowing you to see exactly what parts of the spectrum your image is made up of.
Most digital cameras these days have a histogram option built in. If you don't see yours, look around in the menu to see if these is an option to turn it off an on. You can also find options to view the histograms in most of the popular image editing software like Abobe's Photoshop, Photoshop Elements, Lightroom, Nikon's Capture NX, etc.
The histogram option can also provide a lot of color information, but that is out of the scope of this article.
You might be wondering by now why you should bother with all this stuff when you can just put your camera on auto and shoot. Well, there are some very good reasons.
First off, a camera on auto usually attempts to give you a medium exposure, meaning it balances the lights and darks in a scene and tries to give you an exposure that is balanced between the two. This is the best the camera can do on its own, because it has no idea what you are actually trying to capture. Photography is all about capturing a subject so it appears the way you want it to appear. Sometimes we want a high-key image with large areas of the picture technically over-exposed or blown out. Sometimes it's a low-key image which registers mostly in the lower portion of the histogram.
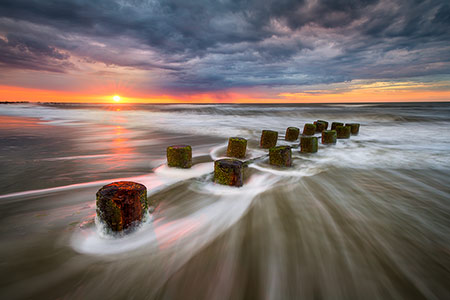
For instance, what if you are trying to capture a brilliant sunset landscape with silhouetted trees and foreground. In an attempt to capture a "medium" exposure, your camera will likely ruin that gorgeous sky in an attempt to balance out the exposure with the foreground elements. Only by setting your camera in manual mode and adjusting it properly will capture the picture as you intended. You could use exposure compensation, but then you are just compensating for improper settings anyway. It's just as easy to just set it properly yourself.
The point is, we don't always want a "medium exposure". Sometimes we want creative control to expose the image the way we see fit, and setting your aperture and shutter speed allows you the ability to get creative with your photography.
I hope these tips will help you to improve your own photography. Use the links to navigate forward, backward, or go to the "Main Menu".